How To Create Ubuntu Virtual Machine Virtualbox
Introduction
VirtualBox is a powerful free tool by Oracle for running a virtual operating system on your computer. In this tutorial learn how to install VirtualBox on Ubuntu and other Debian-based Linux distributions.

Prerequisites
- A user account with sudo privileges
- A terminal window (Ctrl+Alt+T)
Option 1: Install VirtualBox from Ubuntu Repositories
The easiest way to install VirtualBox is by using the official Ubuntu repositories.
1. Open a terminal, and enter the following to update the repository:
sudo apt-get update 2. Download and install VirtualBox by running:
sudo apt-get install virtualbox 
3. Next, install the VirtualBox Extension Pack:
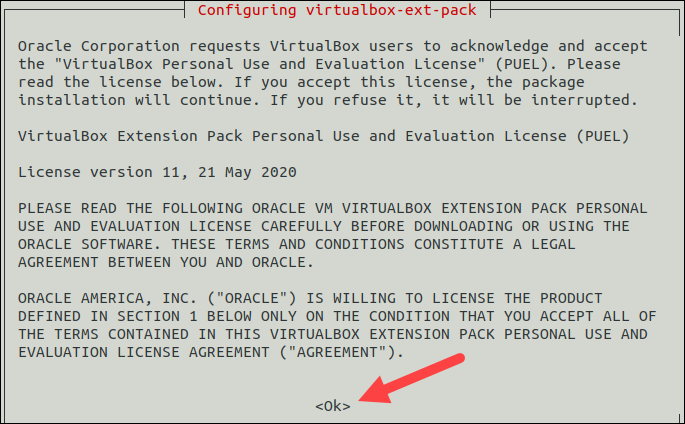
sudo apt-get install virtualbox—ext–pack Read the VirtualBox Extension Pack Personal Use and Evaluation License and select <Ok> to confirm you understand.

Accept the terms of the VirtualBox PUEL license by selecting <Yes> and hitting Enter.

Finally, the output displays you have successfully installed "Oracle VM VirtualBox Extension Pack".

The Extension Pack enhances VirtualBox by adding USB 2.0 and 3.0 support, remote desktop, and encryption.
Option 2: Installing VirtualBox from Oracle's Repositories
Often the default repositories do not have the latest versions of the software. They may work for test environments, but some users need the latest security or functionality patches. This process is more in-depth but installs the most recent version of VirtualBox on Ubuntu.
Install Supporting software
The software-properties-common package is required to run Virtualbox on Ubuntu. It allows you to add new software repositories.
Enter the following into a terminal window:
sudo apt-get install software–properties–common Install GPG keys
GPG keys allow you to verify and communicate with the VirtualBox repository.
To download and install GPG keys, use the commands:
wget -q https://www.virtualbox.org/download/oracle_vbox_2016.asc -O- | sudo apt-key add - wget -q https://www.virtualbox.org/download/oracle_vbox.asc -O- | sudo apt-key add – 
Add VirtualBox Repository to Ubuntu
To add the VirtualBox repository, enter the command :
echo "deb [arch=amd64] http://virtualbox.org/virtualbox/debian $(lsb_release -cs) contrib" | sudo tee /etc/apt/sources.list.d/virtualbox.list Install Latest Version of VirtualBox
1. Start by updating the package lists:
sudo apt-get update 
2. To Install VirtualBox 6.1 on Ubuntu, use the command:
sudo apt-get install virtualbox–6.1 At the time of writing this article, the latest VirtualBox version is 6.1.26. It was designed for 64-bit operating systems. If you're running a 32-bit OS, you can use VirtualBox 5.2 instead.
To install VirtualBox 5.2, enter the following:
sudo apt-get install virtualbox–5.2 Install VirtualBox Extension Pack
The VirtualBox Extension Pack enhances the functionality of your virtual machines. It adds additional tools like USB 2.0 and 3.0, Remote Desktop, and encryption.
1. Enter the following:
wget https://download.virtualbox.org/virtualbox/6.1.26/Oracle_VM_VirtualBox_Extension_Pack-6.1.26.vbox-extpack 
2. Import the Extension Pack:
sudo VBoxManage extpack install Oracle_VM_VirtualBox_Extension_Pack-6.1.26.vbox-extpack Confirm the installation, then allow the process to complete.

Note: The Extension Pack corresponds to the version of VirtualBox. If you're working with VirtualBox 5.2, please see the Version 5.2 downloads page for the Extension Pack.
Using VirtualBox
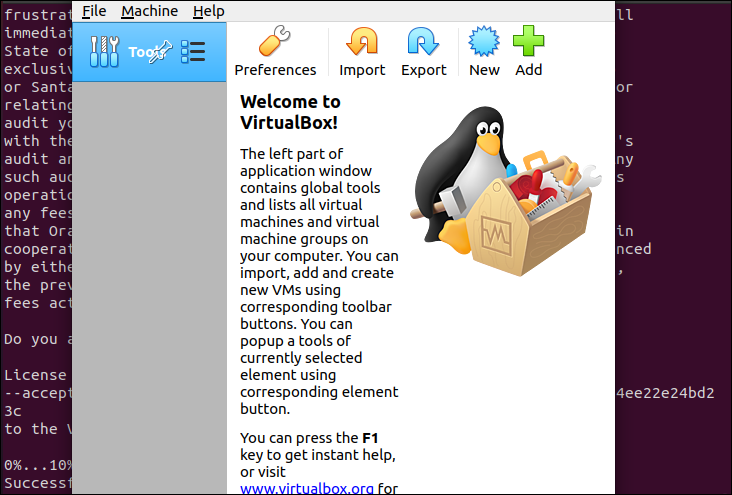
1. Launch the VirtualBox interface by entering the following:
virtualbox 
2. After VirtualBox launches, a graphic interface will load. Use the Add or New button to create a new virtual machine. A dialog will open. Select the operating system and version you'd like to create, then click Next.
3. The dialog will offer you several options for the virtual machine. This is where you allocate memory, hard drive, and other resources to the virtual machine. Use default options if you are unsure about customizing this,
4. Once you finish, a new virtual machine is available in the left column. Select it, and click the green arrow Start button. A new window will open and boot up the virtual machine.
Note: If you need to run a virtual machine from a command line, you can install Vagrant to manage virtual machines from the terminal.
Conclusion
In this tutorial, we covered two methods of installing VirtualBox on Ubuntu. You should now have a working VirtualBox application on your system. For additional information on VirtualBox, visit the VirtualBox Wiki.
And for more tutorials on VirtualBox, be sure to read our guides on How To Install Kali Linux On VirtualBox and How To Install VirtualBox On CentOS 7.
Was this article helpful?
Yes No
How To Create Ubuntu Virtual Machine Virtualbox
Source: https://phoenixnap.com/kb/install-virtualbox-on-ubuntu
Posted by: eckmanonswity.blogspot.com

0 Response to "How To Create Ubuntu Virtual Machine Virtualbox"
Post a Comment